
An interactive map displaying locations and lines of march relevant to the crash landing of B-25 #41-30071 on December 22, 1943.
On December 22, 1943, with the left engine shot out by anti-aircraft fire over Wewak, B-25 #41-30071 of the 501st Squadron, 345th Bomb Group, piloted by Captain Walter D. Kilroy, was forced to crash land at about the same time that his wingman, Lt. Edward Bailey, was last sighted trailing several miles behind. Captain Kilroy made a successful emergency landing in a small area of kunai grass north of the Ramu River. The entire crew of five emerged from the plane and food supplies were dropped by a circling wingman.
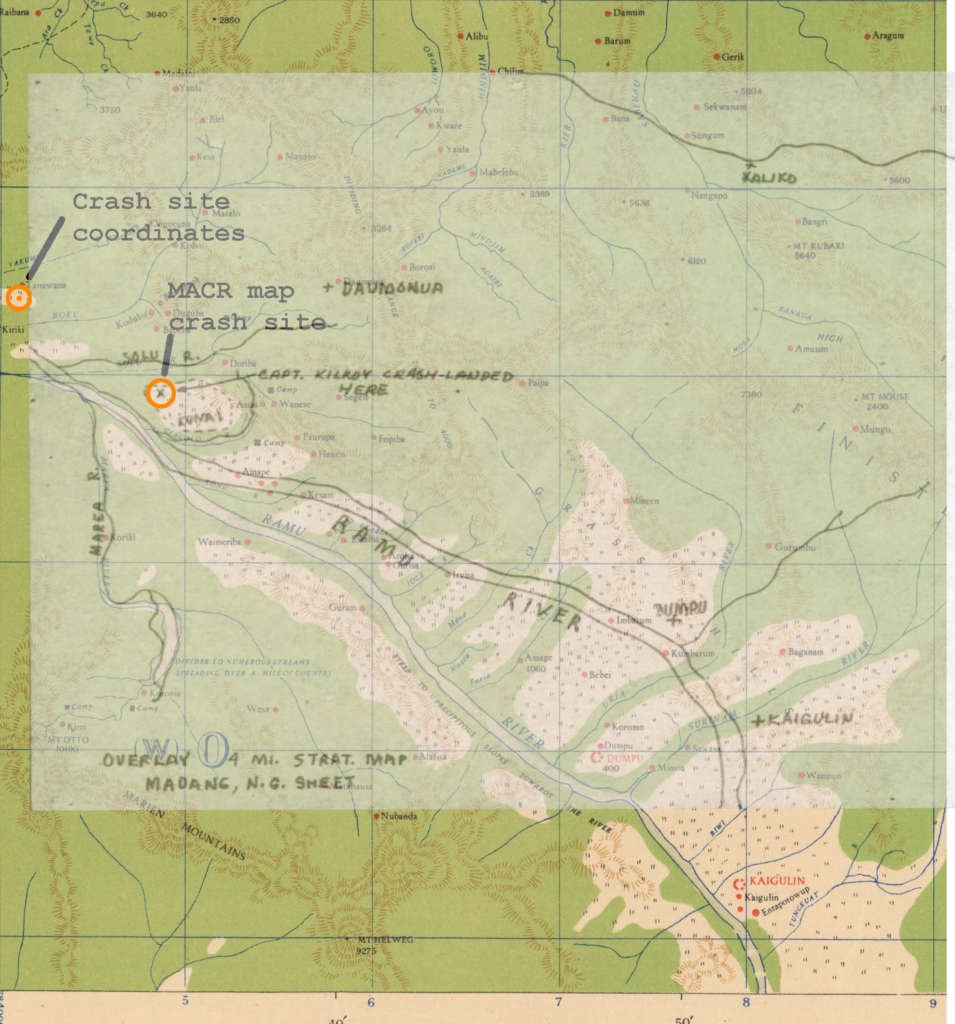
The Missing Air Crew Report for the incident contains a map showing the crash location and the narrative states that the crash was twelve miles northwest of Dumpu. The MACR map was drawn on an overlay of the 4 Mile Strategic Map, Madang sheet.

I found two editions of the 4 Mile Strategic Series map on the National Library of Australia website and after comparison with the MACR map, determined that the 1942 1st Edition was likely used as the overlay. Using the scale on the map, the indicated crash site was closer to being 18 miles northwest of Dumpu. A supplementary mission report, written after the return of the crew to Schwimmer drome in Port Moresby, gave map coordinates for the crash site of WO 4174, which is about 5 miles northwest of the MACR location.
I have no information to indicate that one crash location is more accurate than the other, but it would seem possible that the wingman, who flew to the crash sites several times, might have had a better opportunity to plot the location than a crew that were, to borrow a common saying of the time, “sweating out” their flight in a damaged plane, looking for a place to crash land, and wondering if they would survive.
A rough overlay of the MACR map on the 4 Mile Strategic map is shown below. I cannot account for the disproportionate distortion of the MACR map as it seems to be more pronounced on the right side, making it impossible to align the Ramu River, Daumoina, Dumpu and Kaliko without completely ruining the alignment of the Marea, Solu and Giagolo rivers nearest the crash sites.
After a brief rest to collect themselves, the downed crew walked south until they came to the Ramu River and then followed it upstream. During the several days that they traveled along the river bank, they had daily contact with planes that dropped them supplies and instruction of where to head to meet up with Australian troops. On Christmas Day, a turkey dinner was dropped to them. They met up with an Australian patrol on December 26 and were returned to Port Moresby on December 27. A very different experience than Lt. Bailey went through during the same time period.
On the live map at the top of this page, the dashed yellow line approximates the crew’s line of march and is based on Captain Kilroy’s description of their experience, found in a supplement to the mission report.